Tampilkan postingan dengan label Google. Tampilkan semua postingan

Sabtu, 13 Januari 2018

Top 10 Working Methods/Techniques To Hack Facebook Account/Profiles 2018

We are going to reveal all the methods that hackers generally use to Hack Facebook Account Password easily 2018.


Facebook has become an essential part of our daily life. We share our life moments, photos, videos and text msgs on Facebook. But, when it comes to your privacy and security, you can never be sure on the internet. Facebook and similar websites try their best to ensure the user’s privacy and security but there are still many issues that can cause the hacking of Facebook accounts.

So let’s not ignore this and try to understand how a hacker can hack the Facebook accounts and let’s understand how to safeguard Facebook accounts against hackers.
Top 10 Methods used By Hackers For Hacking Facebook Accounts 2018

1. KeyLogging

Keylogging is one of the easiest ways to hack a Facebook account. A keylogger is a program that records and monitors the user’s input and keeps a log of all keys that are entered. The keylogger can actively send your inputs to hackers via the Internet. You have to be very careful while dealing with keyloggers because even the computer experts become victims of keylogging.
How to detect Keyloggers?
  • Scan your USB drives before using them
  • Download software from trusted sites only
  • Use a good antivirus

2. Phishing

Phishing is very easy and considered as n00b technique but it is one of the most effective techniques of Hacking a Facebook account. There is 50-50 chance for a hacker to get victims password using Phishing if your victim is not aware of basic internet terminologies. There are various ways of carrying out a phishing attack. The most common one is where a hacker creates a replica of a login page which looks like the real Facebook page. The victim will then think it’s the usual login
The most common Phishing to create a duplicate of a login page which looks like the real Facebook page. The victim thinks it’s the usual Facebook login page so he enters his login details in phishing page. Once the victim is logged in through the fake page, the email address and password are stored in a text file or in hacker’s database.
How to detect Phishing Page?
  • Check URL of the login page.
  • Never login your Facebook account on other devices.
  • Use Modern web browsers that identify the phishing page.
  • Avoid emails or text msgs that ask you to log into your Facebook account.

3. Session hijacking

When you log in to your Facebook account, your browser and the facebook’s server maintains a session for user authentication. The session details are saved in your browser’s cookie files. In session hijacking, the hacker steals those cookies and then access the victim’s account. Session hijacking is most common when accessing Facebook on an HTTP (non-secure) connection and it is widely used on LAN and Wi-Fi connections.
How to avoid Session Hijacking
  • Do not use Facebook when connected to shared Wi-Fi or LAN.
  • Try to clear cookies every 2-3 days or if possible daily

4. Saved passwords


Most of the time we share our login and credit card details in the web browser. Anyone can see your Facebook account from your browser’s password manager. A hacker can get physical access to your computer and insert a USB programmed to automatically extract or retrieve saved passwords in the Internet browser or any other information the hacker may need.
How to avoid Password Hacking?
  • Try not to save passwords in web browsers
  • Do not share your device with people
  • Block the device connectors

5. Sidejacking with Firesheep

Firesheep is a tool that used to carry out sidejacking attacks. It only works if the victim is connected to the same Wi-Fi. It is similar to session hijacking but it only works in Wi-Fi networks.
How to avoid Sidejacking
  • Do not use Facebook when connected to a public Wi-Fi network.

6. DNS spoofing

If a hacker is on the same network which is connected to the Victim, he can change the original page and replace it with his own fake page and easily gain access to the victims Facebook account.
How to Avoid DNS Spoofing?
  • Always configure it to be secure against cache poisoning
  • Manage your DNS servers securely

7. Man in the middle attacks

In this method, the hacker secretly relays and possibly alters the communication between the server and victim who believe they are directly communicating with each other.
The hacker makes independent connections with the victims and relays messages between them to make them believe they are talking directly to each other over a private connection, when in fact the entire conversation is controlled by the hacker.
The Hacker must be able to intercept all relevant messages passing between the two victims and inject new ones. This is straightforward in many circumstances; for example, an attacker within reception range of wireless access point can insert himself as a man-in-the-middle.
How to avoid MIME attacks?
  • Use VPN services
  • Use a proxy server to access the internet
  • Use good antivirus with good firewall options

8. Social engineering

Social engineering is a simple method that’s based on collecting as much info from the victims as possible. The information may include the date of birth, phone number, security questions etc. Once a hacker gains access to this info, he can brute force the info or use recovery methods to get login passwords.
How to avoid Social Engineering
  • Never share personal info via email or phone
  • Avoid links from unknown or suspicious sites

9. Botnets

Basically, botnets are networks made of remote-controlled computers or bots. These bots have been infected with malware that allows them to be remotely controlled. It’s expensive to set up botnets and this makes them be minimally used in cases of hacking Facebook accounts. Some very popular botnets include spy eye and Zeus.
How to avoid Botnets 
  • Keep all your software up to date
  • Ensure that your firewall is always on

10. Email ID hacking

With this method, the hacker only needs to access the connected email id of any account and then reset the Facebook password manually.
How to avoid email ID hacking
  • Enable 2 step authentification in your Gmail account
  • Use strong passwords
  • Avoid entering email on scrupulous sites

Minggu, 24 Desember 2017

How To Make Google Chrome Browser Really Fast 2018

How To Make Google Chrome Browser More Faster With These 4 Steps

The method is very simple and we will be editing some hidden feature of chrome in this method and with that you chrome speed will boost up and it will browse webpages faster. So follow up the below methods to proceed:


#1 Method: Editing Chrome Flag Settings To Make It Faster
------------------------------

1. First of all open the address chrome://flags/ in your Google chrome.

2. Now there you will see lots of settings there.

3. Search out for "Maximum tiles for interest area" and change its value to 512 that is maximum RAM that you will be allocating to the Chrome.( You can use ctrl+f to find these options).

4. Now search For the "Number of raster threads" and change its value to 4.

5. Now enable "Enable fast tab/window close".

6. That's it now relaunch your browser and enjoy the faster performance of your browser.

#2 Method: Using Google Chrome Extension
------------------------------

1. Download and install a cool plugin Web Boost in your Google chrome.

2. Thats it this extension will get added to your browser and you can see icon at the right top corner, just click on it to start it.

#3 Method: Changing The Settings In Google Chrome
------------------------------

1. First of all go to three line button at the the top right corner of your Google chrome.

2. Then click on "settings" and then "Show Advanced Settings" 
.
3. Now under privacy look for "Prefetch resources to load pages more quickly" and tick on it.

4. There you will have 3 options listed in your android chrome which can be set according to as:
Always :- If you want to load pages both on cellular and wifi network.
Wifi – If only wifi connection is there then only it will load prefetch pages.
Never :- It will never prefetch pages and this can save your data on your limited connection.

#4 Method: Clearing Cache & unnecessary Plugins and Extensions
------------------------------

1. Type chrome://plugins/ in your google chrome and clear out or say remove the plugins that are unnecessary in your browser.

2. Type chrome://extensions/ in your chrome browser and clear all the extension that you don’t need in your browser.

3. Type chrome://settings/clearBrowserData and clear all your history from beginning including history, cache file and all other saved data of your browser to make it faster.

With these ways you can easily boost up your browser speed and can enjoy fast switching speed between tabs.
------------------------------------------------------------------------------------------

Tag ;- how to make chrome faster 2017,how to make google chrome faster on windows 10,how to make google chrome faster on windows 7,page prefetch chrome,how to make chrome faster android,speed up chrome browser up to 5 times faster,maximum tiles chrome,maximum tiles for interest area,download google chrome for windows 7,google chrome for mac,download google chrome for windows 8,google chrome offline installer,google chrome update,google chrome download for windows xp,google chrome free download latest version for windows 7 32bit,google chrome web store,

Jumat, 18 November 2016

Why To Choose Firebase as Cloud Backend for your Mobile Apps | 2016

Why To Choose Firebase as Cloud Backend for your Mobile Apps | 2016

The market of various apps is growing progressively. The competition in mobile apps development is too high to let yourself spend too much time on your product. Moreover, it’s very important to see the customer’s reaction and how your idea works in real life. That’s why it’s so important to release your application as soon as possible. And one of the best decisions to manage all that is to use Firebase as cloud backend for your mobile apps.
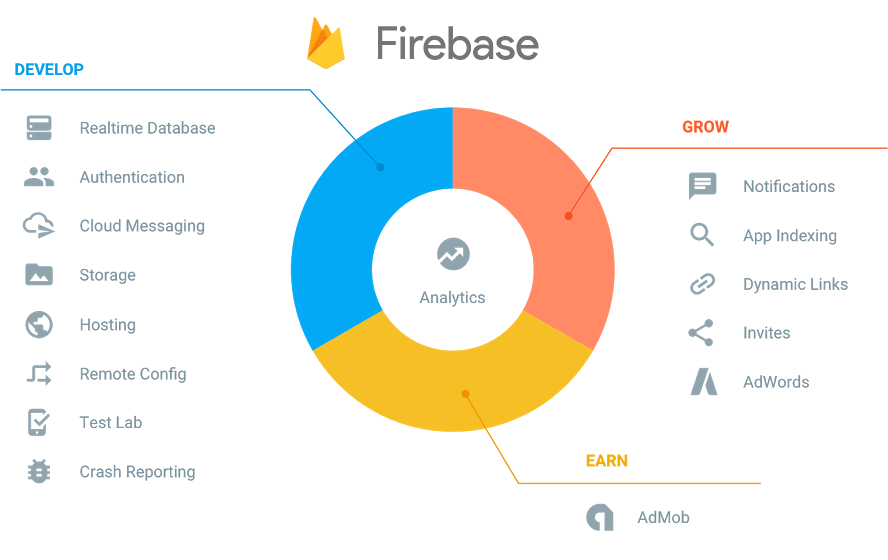
firebase-features
Services offered by Firebase
Firebase is a BaaS (Backend as a service), which provides RTDB (real time database) services for mobile apps and web developers. It was established in 2011 and was purchased by Google in 2015.

Why use Firebase?

Why is it useful and why you may need Firebase? Let’s make a brief of its capabilities for developer’s needs.
Firebase can be your only service to manage your web products and apps if:
  • There is no need for integration with 3rd-party environments (log-in process via social nets, any kind of Maps or payment services)
  • The aim is to create a lightweight app or upgrade an old one.
However, there may be situations which involve adding a server code:
  • The app is complicated and cannot be managed by a front-end code only. A reliable server is needed to run the back-end code;
  • There is a necessity for embedding 3rd-party APIs;
  • Advanced level of safety is needed, and Simple Login service is not enough in this case.
If your app has all or several characteristics listed above and you develop a Firebase-powered app with a back-end code, your server becomes an agent between the client and Firebase. But Firebase itself continues dealing with real-time changes and scaling.

Firebase is RTDB (Real Time Database)

Firebase NoSQL cloud provides a database for real-time applications as a service. This service provides an API for developers, lets you synchronize data and store it in the Firebase cloud. The RTDB syncing function provides the client with all the missing files after the connectivity recovering which makes it very valuable for stable work of your app. The company also took into account the possibility ofintegration with Android, iOS, JavaScript, Java, Objective-C and Node.js applications.

Authentication process

Except traditional auth scheme (login/email-password), 100% Firebase powered app supports simplified login process through different networks. In this situation there is still no need for writing any server code.

Firebase Storage Reliability

Using Firebase SDK to store and scale your data, you may be totally sure of its safety and reliability. The information can be sent directly from the client to Firebase Cloud, various privacy settings can be adjusted to limit access to defined groups or files. Being supported by Google Cloud, Firebase Storage can offer you almost endless storage space for keeping your data.

Firebase Cloud Messaging

Google Cloud Messaging is incorporated into Firebase and works perfectly for web and mobile solutions. C2DM (cloud to device messaging) from Firebase is toll-free.
Speaking about mailout targeting, there are 3 ways how it can be done:
  • To specified devices;
  • To some groups of devices;
  • To devices which are joined by some attributes.
The Firebase service can let you send up to 4 KB to the application but yet save the battery charge.

Notifications

After messages to various users have been sent, it’s very desirable to let recipients know they have some info to check. For this purpose, there is Firebase Notification Console. The principle is similar to the messaging process. Firebase handles notifications without any additional coding. Very handy and time-saving decision to reach your clients.

Firebase Remote Config

As it was mentioned at the beginning, Firebase is incredibly useful when you need to make an application faster. But this also means, in all likelihood, that a capability to upgrade the product without new release is very essential. Remote Config will be very helpful in such circumstances. With assistance of Firebase Console it’s easy to update your app’s design or its behaviour on the fly.

Simplified debugging with Firebase

Test Lab for Android
If you have an Android application, you get an additional bonus from Firebase. Test Lab is great for testing a newly developed app or check it after adding a new feature. Robo test is great for performing tests and emulating user’s behaviour, exploring your app’s UI. Moreover, Test Lab cooperates with various services, like gCloud command line, Android Studio and has extended facilities for testing your product on devices located in Firebase data centers.
Crash Reporting
After testing your app, you can continue with one more tool to finish the testing process – Crash Reporting. With this instrument, all found errors are joined into groups, rated by severity and can be tracked by logs.

Extending the capabilities with Firebase for built apps

If your application is being successfully used by your clients, there are still many spheres where Firebase can be helpful.
Dynamic Links  
How to bring customers from the web right to your mobile app to download it? Dynamic Links can assist with that. Comparing to deep links, this service not only directs users to the app, but navigates to the desired feature after its installation or shows some additional info about the advantages of your product.
Dynamic Links provide the most important info without extra searching steps.
Firebase Invites
Your users can share some info from your app or promote it via invites. This function also works on the basis of Dynamic Links, so if one user shared some info or promo code, or anything else, the invite will lead exactly where it was supposed to (web, App Store or Google Play, etc).

Exhaustive information and further growth of your product

But how to find out the statistics of your app’s downloads and where people found it, which banner was effective or how often a certain link was clicked?
All that and much more can be done by Firebase Analytics. You will be provided with almost unlimited reports on the following topics:
  • Crashes and fixes;
  • Efficiency of your advertising campaign;
  • Customers’ behaviour.
The service is very precious because of its flexibility. You will not have to use different tools to analyze various attributes. Firebase Analytics gathers all the essential data by means of SDKs. All the information will be available for a survey on the Firebase Console. You will see a really wide range of info, starting from geography of downloads and demographic information up to the weak sides of your product.
FA is pretty similar to Google Analytics, just intended to improve your iOS or Android app and toll-free as its older friend as well. With this service, you will surely make your app shine.
AdMob + AdWords
After having analyzed the info about your product, you may want to continue promoting it. And for these needs there are AdMob and AdWords which are now integrated with Firebase. The next step is to make up your choice with the tools that you may want from a huge amount of Google advertisers, define the core users in the Console and enjoy watching the growth of customers.
App Indexing
If you have not only a website but an Android app too, you can associate them to make your users launch the mobile app more often. There is a possibility to connect them in such a way that you may bring the users to your app. Moreover, there is an instrument to define mistakes in your content indexing to make your products appear in search results more often.
All the services and advantages of Firebase, described above will pleasantly surprise with their reasonable prices:
  • Android Test Lab, RTDB and Storage have very reasonable pricing grid;
  • Analytics, Dynamic Links and crash Reporting are distributed without any limitations.
And again, Firebase is suitable for Android, iOS and web, which lets you create and manage products all together, using one multi functional service for all your needs you could ever imagine and get more tremendous results day by day.

FOR MORE UPDATES BROADCAST SERVICE , Type "S2Y YOURNAME" AND SEND US ON 
Whatsapp BroadCast       +91-9691540970
Social: Facebook | Twitter | Instagram 

Minggu, 23 Oktober 2016

ROOT GOOGLE'S PIXEL C [UNLOCK BOOTLOADER, INSTALL CUSTOM RECOVERY, AND ROOT THE PIXEL C]

ROOT GOOGLE'S PIXEL C [UNLOCK BOOTLOADER, INSTALL CUSTOM RECOVERY, AND ROOT THE PIXEL C]

ROOT GOOGLE'S PIXEL C
WARNING:
 This will wipe your device. Backup anything important before you start. I mostly made this guide for selfish reasons. cheep5k8 has done a great job but some of the instructions are a little vague. I like being spoon fed and I wanted a resource to refer to in the future. You know the drill. If it breaks, not my problem.
There may be more efficient ways to do this, but this will get you where you need to be. If you find any problems or have any suggestions, feel free to reply (BE VERY SPECIFIC WITH STEPS) and I will do my best to update the instructions.

REQUIRED FILES FOR WINDOWS:
  • ADB/Fastboot - Minimal ADB and Fastboot
  • ADB/Fastboot Drivers - I recommend using Wugfresh's Nexus Root Toolkit and using the full driver installation guide. Alternatively, you can install them yourself using the official Google Drivers (no installer)
  • An easy way to access the ADB prompt is to navigate to the directory that ADB is installed in, hold shift and right click inside the directory. This will give you an expanded right click menu that includes an option to "Open command window here." Select this option and a command prompt will open that is already in the ADB directory, saving you from having to do a bunch of cd nonsense. You can check to see if your device is recognized in ADB by typing "adb devices." If ADB and the driver are all working correctly, it should come back with something like "5A20001071 device." You can also check to make sure your device is recognized in fastboot by booting to the bootloader and typing "fastboot devices." It will show something similar.
Necessary Files To be DOWLOADED:

STEPS:

Enable developer mode
  1. Go to Settings > About tablet
  2. Tap on Build Number 7 times until it says "You are now a developer"
Enable OEM Unlocking
  1. Go to Settings > Developer options
  2. Enable OEM Unlocking
  3. Tap on Enable when a disclaimer pops up
Enable USB Debugging (ADB)
  1. Go to Settings > Developer options
  2. Enable USB debugging
  3. Tap on OK when prompted with a disclaimer
  4. If the ADB USB driver has been installed, you will see a popup that says "The computer's RSA key fingerprint is: xx:xx:xx:xx
  5. Check the box next to "Always allow from this computer"
  6. Tap on OK

Unlock Bootloader:
  1. Open ADB prompt (see prerequisites)
  2. Input the following:
    Code:
    adb reboot-bootloader
  3. The device will now boot into the bootloader and say
    Code:
    Waiting for fastboot command...
  4. Input the following to unlock the bootloader:
    Code:
    fastboot flashing unlock
  5. You will be prompted on the tablet screen with a warning about unlocking the bootloader.
  6. Press the power button to unlock the bootloader.
  7. The device will reboot and say "Bootloader is unlocked and OS verification is OFF. Device will continue booting in 30 seconds." You will also hear an audible beep. You will then see the green android with some spinny stuff. This is the userdata being formatted.
  8. When complete, the device will boot back into the bootloader and say
    Code:
    Waiting for fastboot command...
  9. Boot back into Android by inputting:
    Code:
    fastboot reboot
  10. Your Pixel C will be reset, so you will need to re-enable USB debugging. Connect to your wireless network and then skip past everything else in the initial setup, as all of this setup info will be wiped again later on. Refer to the "Enable USB Debugging (ADB)" steps above to re-enable USB debugging.

Install Custom Recovery:
  1. Open ADB prompt (see prerequisites)
  2. Input the following:
    Code:
    adb reboot-bootloader
  3. The device will now boot into the bootloader and say
    Code:
    Waiting for fastboot command...
  4. With the Pixel C in the Fastboot bootloader and the recovery file in your ADB directory, input the following:
    Code:
    fastboot flash recovery (replace with custom recovery filename).img
    Example:
    Code:
    C:\>fastboot flash recovery twrp-2.8.7.0-dragon-ryu-01082016-2.img
    target reported max download size of 268435456 bytes
    erasing 'recovery'...
    (bootloader) erasing flash
    OKAY [ 0.054s]
    sending 'recovery' (13760 KB)...
    OKAY [ 0.349s]
    writing 'recovery'...
    (bootloader) writing flash
    OKAY [ 0.375s]
    finished. total time: 0.783s
  5. Reboot into Recovery using the physical buttons. If you reboot the device back into Android, it will write over the custom recovery with the stock one. This will be fixed in the future.
    Code:
    Power + Volume down until screen turns off, keep pressing volume down to boot into Coreboot Bootloader. Navigate to Reboot into Android Recovery with volume down and then press power to select.

Install Root:
  1. In TWRP, navigate to Wipe > Format Data
  2. Type "yes" in the warning prompt and wait for the userdata partition to format. Again, this will wipe your tablet.
  3. Press the Home button at the bottom when the format is complete
  4. Navigate to Reboot > Bootloader to boot back into Fastboot
  5. In the ADB prompt, flash the new kernel:
    Code:
    fastboot flash boot (replace with xCeeD kernel filename).img
    Example:
    Code:
    C:\>fastboot flash boot xceed-kernel-google-dragon-02-01-2016-RC1.img
    target reported max download size of 268435456 bytes
    erasing 'boot'...
    (bootloader) erasing flash
    OKAY [ 0.064s]
    sending 'boot' (6220 KB)...
    OKAY [ 0.161s]
    writing 'boot'...
    (bootloader) writing flash
    OKAY [ 0.197s]
    finished. total time: 0.426s
  6. Reboot into Android. The device may boot twice.
    Code:
    fastboot reboot
  7. Reboot back into Recovery. Power + Volume down until screen turns off, keep pressing volume down to boot into Coreboot Bootloader. Navigate to Reboot into Android Recovery with volume down and then press power to select.
  8. In TWRP, navigate to Mount and check only Data
  9. In the ADB prompt move su.img to /data:
    Code:
    adb push su.img /data
    Example:
    Code:
    C:\>adb push su.img /data
    5677 KB/s (33554432 bytes in 5.772s)
  10. In TWRP, navigate to Mount and uncheck Data
  11. In TWRP, navigate to Reboot > System
  12. Perform initial device setup
  13. Once you are at the home launcher, re-enable USB debugging (Refer to Device Prep)
  14. In the ADB prompt, install superuser.apk:
    Code:
    adb install Superuser.apk
    Example:
    Code:
    C:\>adb install Superuser.apk
    8612 KB/s (6227998 bytes in 0.706s)
    pkg: /data/local/tmp/Superuser.apk
    Success
  15. Install Busybox from the Play Store: link

HURAAYYY !!!! YOUR PHONE IS ROOTED

Reference-: Xda Developers :-)

FOR MORE UPDATES BROADCAST SERVICE , Type "S2Y YOURNAME" AND SEND US ON 
Whatsapp BroadCast       +91-9691540970

Social: Facebook | Twitter | Instagram